
Before we get to these delicious caramelized apple and coconut sticky buns, I need to announce the winner of the giveaway for the Smitten with Squash cookbook by Amanda Paa. Kelli who made a fall themed strudel with butternut squash, caramelized onions and kale is the winner of this giveaway. Kelli, please shoot me an email with your details so I can have your book sent out to you at abrowntable [at] gmail [dot] com.
As a kid, when I thought I would someday enroll in culinary school, I also harbored a not-so-secret desire to become a pastry chef. Pastry chefs are like magicians (or more appropriately culinary scientists) in my head. They come up with wondrous edible marvels that require a good knowledge of chemistry and food both of which make the inner geek in me rather happy. That desire didn’t pan out as I would have wished but then this blog came about and now I find myself baking sticky buns at home!
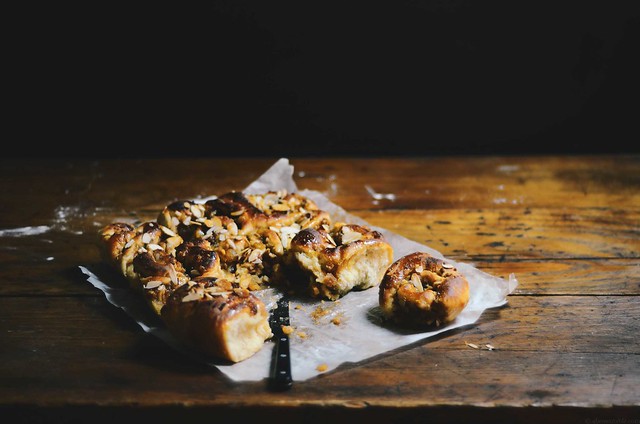
Sticky buns are definitely an indulgent treat however, if I am going to make a batch at home, I like to have them stuffed up with something other than cinnamon and sugar. I decided to fill the swirls in these buns with little bits of apple and golden raisins enveloped with the delicious flavor of coconut. There’s a little bit of applesauce to bring all the flavors together in the filling with a hint of cinnamon, all in all I think these are great to serve at a fall inspired brunch or breakfast.
I got the basic dough recipe for the sticky buns from one of my favorite cookbooks, The Cook’s Illustrated Baking Book.
Here are some of my kitchen tips that you might find useful when preparing these guys;
- Make sure your yeast hasn’t expired or else the dough will not ferment and rise properly.
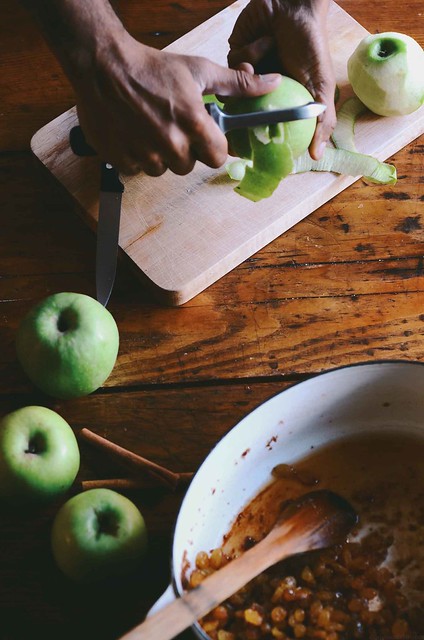
- Use fresh cinnamon and firm and ripe Granny Smith apples. Cut those apple bits into small bits so the dough will fold over easily during rolling. Granny Smith apples hold their texture well during baking but they also have a little tartness to them which balances the sweetness of the filling.
- Personally, I don’t like too much of a sugar glaze, so I made a very small amount of glaze for these buns. You can easily increase the amount of glaze by doubling the quantities of the ingredients listed for the glaze below.
- I used sliced almonds to top the buns but you can use pecans, walnuts, pistachios and probably any other type of your favorite nut.
caramelized apple sticky buns (adapted from The Cook’s Illustrated Baking Book)
yields: 12 buns
ingredients
filling
1 lb granny smith apples
2 tablespoons unsalted butter
1 teaspoon lemon juice, freshly squeezed
1 cup unsweetened apple sauce
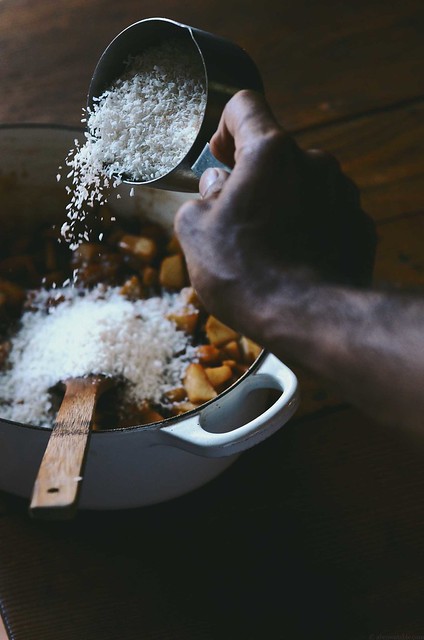
1 cup unsweetened shredded coconut
1/2 cup golden raisins
3 tablespoons brown sugar
1/2 teaspoon cinnamon powder, freshly ground
dough
3 larges eggs, at room temperature
3/4 cup buttermilk, at room temperature
1/4 cup (1 3/4 ounces) brown sugar
2 1/4 teaspoons instant/rapid-rise yeast
1 1/4 teaspoons kosher sea salt
4 1/4 cups (21 1/4 ounces) all-purpose flour + extra for dusting
6 tablespoons unsalted butter, melted and cooled + 1 tablespoon for brushing the dough and greasing the pan (*you can also use a neutral vegetable oil spray to coat the pan, but don’t use olive oil)
1/2 cup sliced raw almonds
glaze (if you want more glaze, double the quantity)
1 tablespoon unsalted butter
1/4 cup brown sugar
4 tablespoons honey
4 tablespoons water
1/4 teaspoon kosher sea salt
1/4 teaspoon cinnamon, freshly ground
1. Wash the apples, peel and cored them. Chop the apples into very tiny pieces (the smaller the better as it will be easier to handle when wrapping the dough).
2. Heat a thick bottomed medium-sized saucepan on a medium-high flame. Melt the butter in the saucepan and then add the apples along with the lemon juice, apple sauce, coconut, raisins, sugar and cinnamon. Mix evenly with a wooden spoon or silicone spatula, cover the saucepan with a lid and cook for about 8-10 minutes with occasional stirring to prevent any burning. Remove and keep aside until ready to use.
3. Using the paddle attachment of a stand mixer whisk the eggs on medium-high speed for about 2 minutes. Add the buttermilk and whisk for about 1 minute. Then add the brown sugar, yeast and salt and combine for about 1 minute. Add 2 cups of the flour and mix with the paddle attachment until combined. Then remove and replace the paddle attachment with the dough blade. Add the next 2 cups of flour and the 6 tablespoons of melted butter, mix until the dough comes together for about 5 minutes.
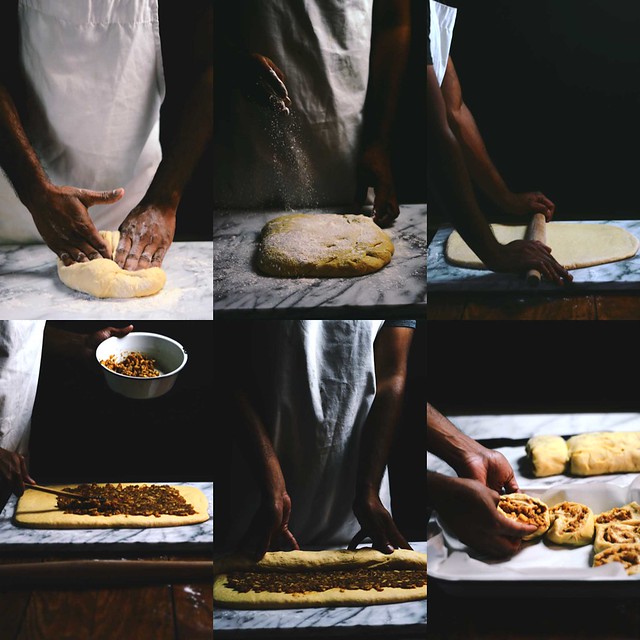
4. Transfer the dough to a clean and lightly floured surface. Knead with hands for about 5 minutes adding the remaining 1/4 cup flour as needed to bring the dough together. The dough should not be sticky but should be soft and pliable. (You might need to add a little more flour if the 1/4 cup isn’t enough, avoid adding too much flour). Once the dough has come together, transfer it to a well-oiled bowl, place it in there and brush lightly with a little oil (a neutral vegetable oil spray would work too). Cover the bowl with cling film and keep it in a warm place. Allow the dough to double in size for about 2 1/2 hours.
5. Transfer the risen dough to a clean and lightly floured surface and shape it into a small rectangle with your hands. Using a rolling pan, roll out the dough into a 16 X 12 inch rectangle, dusting lightly with flour as needed. Brush the dough with the remaining tablespoon of butter, leaving a half inch border along the top edge.
6. Using a large flat spoon or silicone spatula, transfer and spread the apple filling over the dough. Smooth with your hand or the spoon. Lightly grease your hands before you handle the dough. Starting with the longer side, begin to lift the dough and roll, pressing tightly but gently to form a cylinder. Pinch the ends firmly to seal the cylinder. Using your hands, gently shape the cylinder to an even diameter. The cylinder should be around 18 inches in length. Using a sharp serrated bread knife, gently cut through the center of the cylinder with a sawing motion. Cut each half similarly into 6 equal parts. Line a rectangular baking (13 X 11 inch) dish with parchment paper, grease lightly with a little butter (or spray lightly with an oil spray). Place each of the 12 buns in the pan cut side down, arranged next to each other. Cover and allow to rise for 1 1/2 hours in a warm spot.
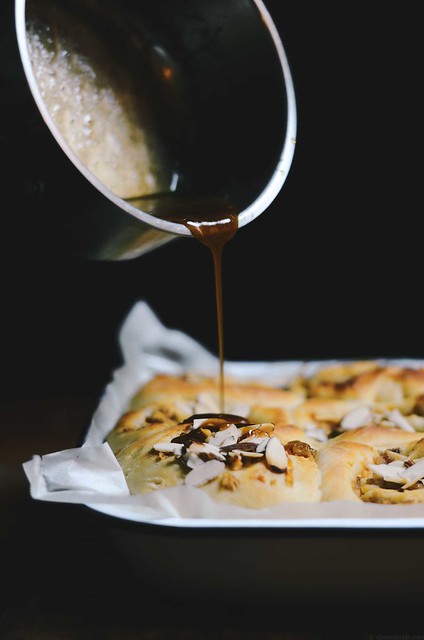
7. While the buns are rising, prepare the glaze. In a small stockpot, melt the 2 tablespoons of butter on a medium-high flame. Add the sugar, honey, water, salt and cinnamon and stir until the mixture is smooth and the sugar has completely dissolved. Bring the syrup to a boil and then cook for another 5 minutes with constant stirring until it just begins to caramelize. Immediately remove from stove and keep aside until ready to use. If the glaze begins to harden, warm it slightly before use to melt and add 2 -3 tablespoons of water to dissolve it.
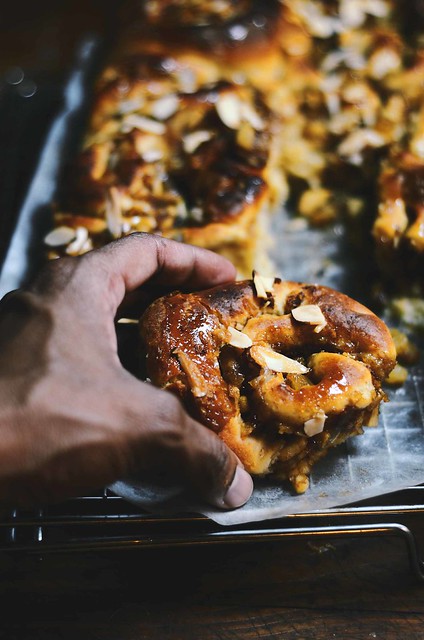
8. Place a wire rack in the center of the oven and a pizza stone on it (if you don’t have a pizza stone to bake with, just use the wire rack). Heat the oven to 350F. Once the oven is warm, sprinkle the almonds over the buns and bake the pan with the buns for about 20-25 minutes until just golden brown. Immediately remove from oven and carefully drizzle with the warm glaze all over the top of the buns. Transfer the buns back into the oven and bake for another 6-8 minutes until the glaze just begins to caramelize (watch it carefully to make sure it doesn’t burn). Remove the pan from the oven and allow to cool for 10 minutes on a wire rack. Slide the buns out of the pan using the parchment paper onto a wire rack. Serve warm by pulling the buns apart or cutting through with a serrated knife.
14 Responses
Yesssss these are so, so amazing! You’re a culinary scientist for sure 😉 I love the step photos and the final photos and all photos in between! So stunning, and they sound beyond delicious. Thanks for sharing, Nik!
they look like they are from a bakery..love the addition of apples!!!
I love the use of coconut here, adding a bit of fruity elevation to a typically heavily warm, spiced recipe. And indeed, pastry chefs are the magicians of the food world! One step inside a stunning pâtisserie and that’s almost self-evident. This dough looks like it quite qualifies 🙂
I can’t believe how incredibly delicious these look. I love the flavor combination and your photos are always so stunning.
These look incredible Nik, love the pics as always too!!
We both talk about similar dreams on the blog today 😉 Pastry chef or not, your work here is beautiful. A lovely tender crumb and picture perfect swirls. And there’s coconut in there- great shot! I love coconut! I’m a huge kitchen tip girl myself, so thank you for your notes above as well. Well done 🙂
I’m totally with you, Nik, on wanting to become a pastry chef. Although I say you don’t even need the training–look at these phenomenal buns!!! Seriously fabulous-sounding flavor combination and I LOVE these step-by-step photos!!!
Wow!! LOVE that Cook’s Illustrated book. Nik, we should bake together sometime.
Wow, I have been dying for a sweet bun like this for days. Yours look so good. Love the photos!
Oh yeah I can dive into these. Awesome pairing apples and coconut with this. Perfect for the cooler shorter days!
Stop teasing me with your sticky buns. HA!!
Caramelized apple does it in every single way! This recipe is way awesome, and these step-by-step photos are so incredibly beautiful, Nik! Gorgeous, through and through!
I love sticky buns, these look divine!
So gorgeous! A fall breakfast I would fall in love with.